What is it?
The workflow action Set contact status as marketing is now available in more types of workflows, rather than only in contact-based workflows.
Why does this matter?
Until now, the action Set contact status as marketing was only available in contact workflows. This is because the action only applies to contacts, since they are the only record type with a marketing status. This also meant the action could only be used with triggers available in contact workflows, which is not suitable for every use case. With the update now in place, you can set the associated contacts of other object types to marketing or non-marketing, from other types of workflows.
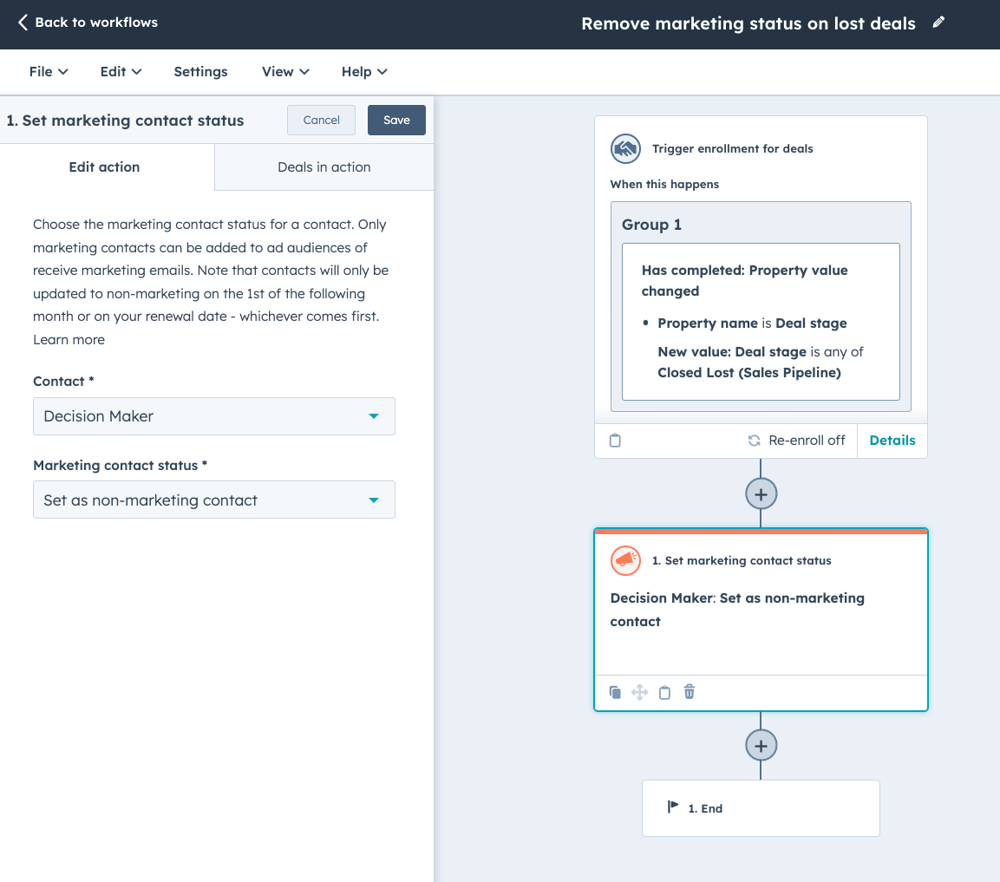
For example, from a deal workflow you can trigger automation when a deal is lost and use the action Set contact status as marketing to set the "Decision maker" contact associated with that deal to non-marketing, so you automatically reduce costs for contacts you no longer engage with.
How does it work?
Because these three actions can only be run against contacts, when using them in workflows of other types you need to define which contact the action should apply to.
Follow these steps to set up the example above:
- In your HubSpot account, navigate to Automation > Workflows
- Click to create a new workflow from scratch
- Choose a deal-based workflow and set a trigger
- Click to add the action Set contact status as marketing
- You will now see a new field on the action labelled "Contact", where a specific type of contact must be selected
- To choose which contact you want to change the marketing status for, click the "Edit available data" link shown in the dropdown field
- Follow the steps to add a new data source for the Contact record type; you can use association labels or other filters to choose which associated contact the action should update.
When these actions are used in workflows other than contact workflows, they can currently only be run against one contact at a time.
Who gets it?
Customer Platform Professional, Customer Platform Enterprise, Marketing Pro, Marketing Enterprise
What is it?
You can now edit or delete campaign UTM values, giving you more control and more accurate reporting.

Why does this matter?
This new feature ensures accurate and up-to-date campaign UTM tracking, so you can make data-based decisions more easily and quickly.
By giving you full control over your UTMs, this feature helps maintain clean and reliable tracking, ultimately improving campaign performance and ROI.
How does it work?
Editing your campaign UTM value(s)
- Navigate to Campaigns
- Create a new campaign or select an existing one
- In the Details panel on the left, find the Campaign UTM property and click the pencil icon to edit it.
- Adjust the campaign UTM value and click Save at the bottom of the screen.
Deleting your campaign UTM value(s)
- Navigate to Campaigns
- Create a new campaign or select an existing one
- In the Details panel on the left, find the Campaign UTM property and click Details.
- In the Campaign UTM panel, hover over the UTM value you want to delete. Click Delete and confirm the action.
Important:
- Only secondary campaign UTM values can be deleted. To delete the default campaign UTM value, first update it with a new value, then delete the previous one.
- Deleting a campaign UTM value is permanent and will remove it from your account. Traffic associated with that UTM value will no longer be tracked.
Who gets it?
The Campaigns tool is available for Marketing Hub Professional and Enterprise users.
What is it?
New updates and features are being introduced that let you create lists more easily and faster.
Why does this matter?
Today, building your lists requires too many upfront decisions. In reality, naming your list, choosing custom properties and deciding whether the list should be active or dynamic are choices you should make after you have determined your ideal segment.
How does it work?
1. The new 'Create list' page streamlines your process. You are no longer asked for name, description, processing type or custom properties. Instead, you can quickly select the right object and even use AI for any standard object to help you retrieve the right criteria.

2. If you are an active list user, you can now click 'Quick create' to get started without having to go through the process above every time:

3. Whichever route you take, you will quickly end up on the list creation page, where you can:
- Change the name of your list to a default name
- Quickly change the object if you want to segment on a different data source
- Use AI to help you find the right filter

4. When you click 'Finish list', you can now:
- Choose the processing type
- Add a description and any custom properties that help you organise your lists.
- Set exclusions for lists or contacts you don't want to be part of this segment
- Set view/edit permissions for this specific list (Enterprise only beta)


Who gets it?
All hubs and tiers
What is it?
The HubSpot Sales add-ins in Outlook now also work in Outlook Calendar. When you open an event that is synced with HubSpot, you can open the HubSpot Sales add-in and get the option to log in, add new contacts to HubSpot and get direct access to the meeting assistant.
Why does this matter?
Streamlines the meeting workflow by placing HubSpot's meeting capabilities directly in users' Outlook Calendar. Salespeople can stay focused on their meetings instead of having to switch between applications to access key meeting features.
- Direct access to meeting assistant features within Outlook Calendar (Sales Pro+ users)
- Quickly log meeting outcomes where you manage your calendar
- Immediate sync of all updates to HubSpot
- Easy activation via the existing HubSpot Sales Outlook add-in
How does it work?
To use this, you need to connect your calendar to HubSpot. For Outlook 365 users, go to Outlook Calendar and open an event that is already synced with HubSpot.
In the event, go to the add-ins toolbar and click HubSpot Sales. This icon may appear to the right of other menu options, but you can customise the toolbar to move it further left. This opens the HubSpot Sales add-in in the sidebar.
In the sidebar, users can log the outcome of a meeting, view existing contacts, add new contacts and open the meeting assistant (for Sales Pro+ users). All actions are updated in HubSpot and keep your data in sync.

Note: if you still don't see the add-in in Outlook Calendar, or if there are other issues, check that you are using the most recent version and restart Outlook.
Who gets it?
All hubs and tiers
What is it?
The meeting assistant in the sales workspace helps you prepare for meetings and handle follow-up tasks using AI-driven insights from your CRM data. This tool now supports call summaries from both HubSpot and Zoom.
Why does this matter?
Meeting preparation and follow-up are crucial but time-consuming steps in the sales process. The meeting assistant helps you:
- Access relevant customer information and conversation history in one place ahead of meetings
- Retrieve AI-generated meeting summaries to capture key points and action items
- Track and manage follow-up tasks more efficiently
- Reduce no-shows with automated attendance touchpoints
How does it work?
Go to the meeting assistant via:
- Sales workspace > Guided actions for upcoming meetings
- Sales workspace > the Schedule tab
For upcoming meetings, select a scheduled meeting to view the following:
- Attendee profiles and CRM records
- Recent interaction history
- Tech stack information
- AI conversation suggestions
- One-click tools to contact attendees who have not yet joined

For past meetings, click a completed meeting to:
- View AI-generated call summaries (for HubSpot calls and Zoom meetings)
- Access recommended follow-up tasks
- Generate follow-up emails based on the conversation
- Log meeting notes

Requirements for meeting summaries:
- HubSpot calling: Transcriptions must be enabled
- Zoom meetings:
- Zoom integration must be installed
- Recording and transcription must be enabled
Who gets it?
This feature is available to HubSpot Sales Hub Professional and Enterprise customers.
You can now add 3 new asset types to your campaigns:
- Calls
- Emails
- Meetings

Why does this matter?
Calls, emails and meetings are crucial touchpoints in a marketing campaign because they provide personal interaction, build trust and guide prospects through the decision-making process.
By adding them to a campaign, every interaction is tracked correctly and you can view everything for all channels within a single campaign.
How does it work?
Adding calls, emails and/or meetings to your campaign
- Navigate to campaigns
- Create a new campaign or select an existing campaign
- On the Campaign details page, navigate to the 'Add assets' window by clicking the 'Add assets' CTA
- Then select the Sales category
- Click Calls, Emails or Meetings
- Select existing assets from the list or create new ones
- Once you have done that, click 'save'
Just as with other assets, you can also add these assets in the editors: when creating the email, scheduling the call or setting up the meeting, simply navigate to 'associated with 1 record' and select or create the campaign from there.
Measuring asset performance
Once your assets have been added to your campaign, you can find the asset in two places on the Campaign details page:
1. Assets 'tab': Here you can view calls, emails and meeting details, including name, status and notes.
2. Performance 'tab': This section helps you track the performance of your assets and their attribution to 'influenced contacts' and 'revenue' metrics:
- Sales call connected (attended)
- Sales email replied
- Sales meeting attended
Who gets it?
The campaigns tool is available for Marketing Pro and Marketing Enterprise users.
The respective assets are available for the following users: Sales Starter, Sales Pro, Sales Enterprise, Service Starter, Service Pro, Service Enterprise.
Want to know how HubSpot can help you?