The new HubBetas of January 2024
 Carsten huiskamp
Discover how adding beta features to your HubSpot account can take your business to the next level.
What are beta features and why are they important for HubSpot?
Beta features are new and experimental features made available by HubSpot. They are introduced to test and improve new capabilities before they are officially launched. Beta features can take various forms, such as innovative tools, functionalities or, for example, integrations that are currently still in the testing phase.
The importance of these betas for HubSpot is that they give users the opportunity to be among the first to access and experiment with new features. This enables businesses to optimise their marketing and sales processes and gain an edge over their competitors.
How to activate beta features in your HubSpot account.
Adding beta features to your HubSpot account is simple. Follow these steps to get started:
1. Click on your profile photo in the top right corner and then click on Product updates.
2. In the menu on the left, navigate to Betas under Early Access.
3. View the list of available public beta features and then click Join beta to choose a specific feature.
4. In the dialogue box, select the Enroll entire account radio button to give all users in your account access, or select the Enroll only me radio button if you only want to enrol yourself.
5. Click Join beta.
6. After enrolling in the beta, you can leave the beta at any time by clicking on Leave beta. You can also click Edit under the name of the beta to change whether all users in your account are enrolled or not.
Note: Beta features may still be under development and may contain bugs or other issues. Be prepared to give feedback and report any issues to HubSpot.
The benefits of using beta features in HubSpot
Using beta features in HubSpot has several benefits:
- Early access to new features: By using beta features, you are among the first users to gain access to new and improved features. This allows you to explore and take advantage of these features before they are officially rolled out to all users.
- Competitive advantage: By being among the first to use new features, you can gain an edge over your competitors. You can use these features to optimise your marketing and sales processes and work more efficiently.
- Ability to give feedback: As a user of beta features, you have the opportunity to give valuable feedback to HubSpot. You can report any issues, make suggestions for improvements and contribute ideas to the development of the features.
- Influence on product development: By giving feedback and actively using beta features, you can influence HubSpot's product development. Your input can lead to adjustments and improvements that align with your specific needs and preferences.
In short, using beta features offers the opportunity to take your HubSpot account to the next level and make the most of the latest developments and capabilities.
Tips and best practices for optimising beta features in HubSpot
To get the most out of beta features in HubSpot, here are some tips and best practices:
- Follow the documentation: Consult the documentation and guides for the beta feature you want to use. This will help you set up the feature correctly and understand how best to use it.
- Give feedback: Make use of the opportunity to give feedback to HubSpot. If you experience issues or have suggestions for improvements, share these with HubSpot. This helps them further optimise the features and adapt them to users' needs.
- Stay informed: Keep an eye on HubSpot's release notes and announcements to stay up to date on new beta features and updates. This way, you won't miss any new capabilities that could be relevant to your business.
By following these tips and actively using beta features, you can optimise your HubSpot account and take full advantage of its benefits.
New beta features in HubSpot
Generating reports with AI:
Using HubSpot AI, you can now effortlessly generate reports with just a simple question or description. AI-assisted reports make it easy to get started straight away with creating reports to answer key business questions
How do you do this?
After selecting "Create report" in the Dashboard or the report library, go to the new "Generate with HubSpot AI" flow where you can describe your report and let HubSpot AI generate it.
These reports work just like any other single-object HubSpot report, so you can edit, refine and save them to fine-tune the report. Edit the reports by changing the prompt with additions such as "in the past month", "show me a pie chart", or see what HubSpot AI comes up with on its own.
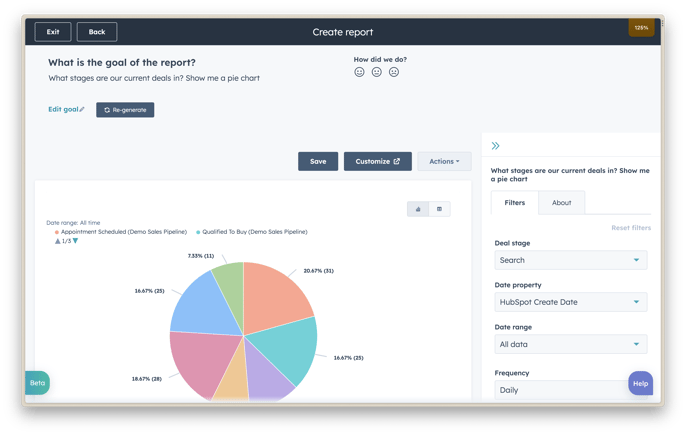
Once the report is generated, you can save it to a dashboard or continue editing it until it displays all the desired data.
AI Assistant for workflow descriptions:
You can now use HubSpot's AI Assistant to instantly interpret and summarise a workflow. This AI Assistant makes it easier than ever to give a clear description to all your workflows, no matter how extensive.
How do you do this?
Within the workflow, click on the name; here you will see a button with "Generate". Click on this and HubSpot AI will automatically fill in the description. This feature will save you an enormous amount of time and effort when creating workflows. Instead of manually writing a description yourself, HubSpot's AI Assistant takes this task off your hands. All you need to do is click the button and the AI will automatically generate a clear and concise description.
This is especially useful if you have complex workflows with many steps and conditions. With the AI Assistant, you can understand the entire workflow at a glance without having to go through every detail yourself. This not only saves time but also makes your workflows easier to manage and reduces the room for error. In short, with the AI Assistant for workflow descriptions, you can streamline your workflow creation process and work more efficiently.
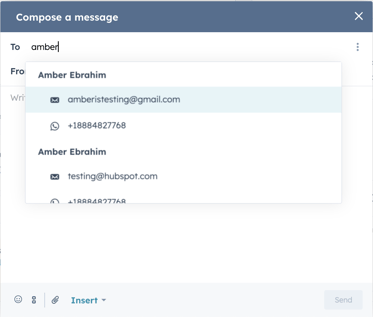
Easily start WhatsApp and email conversations via the Omnichannel Inbox Composer:
With the new "Compose" button in Inbox Conversations, users can now start email or WhatsApp conversations directly. This is a significant improvement because inbox users previously had to start conversations across different inbox channels. Now everything is conveniently brought together under one button!
How do you do this?
Go to Inbox Conversations and click the "Compose" button in the bottom left. Choose a contact with email or WhatsApp information* stored in their record and start composing!
* WhatsApp access is available for Marketing and Service Hub Pro and Enterprise subscriptions, and users must set up the WhatsApp integration to be able to use WhatsApp as a communication channel.
Previously, users could start email conversations but had to wait until their contacts had started a conversation via WhatsApp in order to communicate through that channel. Going forward, the ability to start communication via WhatsApp and email will be easily accessible from the combined view in Conversations Inbox.
These are just a few examples of beta features you can use to optimise your HubSpot account. It is advisable to regularly explore the available beta features to see which betas are most relevant to your business.
Customised reminder emails on meeting scheduling pages
Previously, all reminder emails were sent using the same basic template in the run-up to a meeting. Now HubSpot users can customise and personalise meeting reminders.
How do you do this?
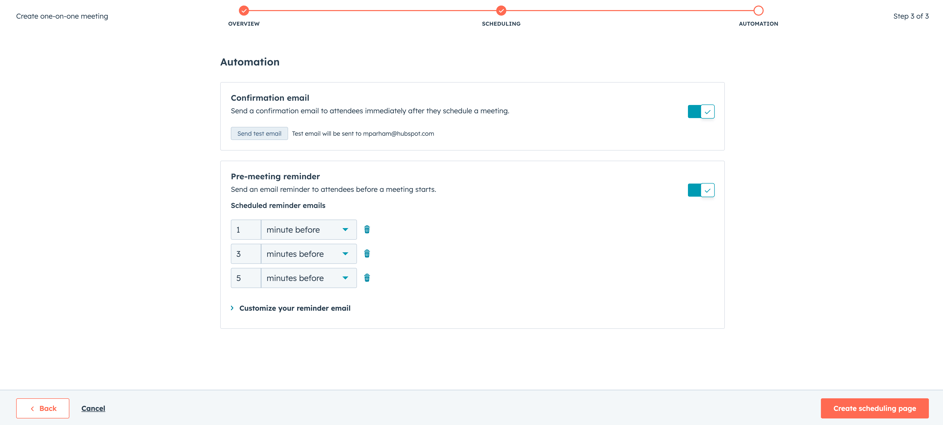
To configure customised reminders for meetings booked via scheduling pages, first go to Sales > Meetings and create a new scheduling page or edit an existing one.
Navigate to the Automations step within the configuration of your booking page. Enable reminder emails and you will see a new section at the bottom of the page for customising your reminder email.
Click the arrow to expand the "Customise your reminder email" section.
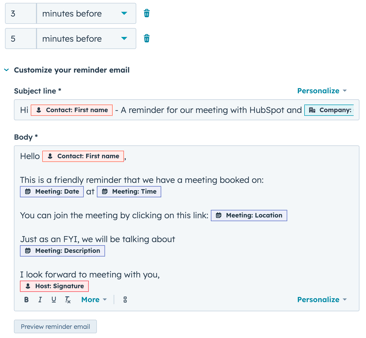
Users can customise the subject line and body of the email by including their desired text and personalisation tokens. Include personalisation tokens for the contact, the company, the meeting organiser and the meeting itself. This lets you determine how best to communicate your location, time and host information in the email, making it easier for both the rep and the prospect to convey the right information ahead of the meeting.
Content Assistant for engagement, website visit and lead generation ads
HubSpot users can now use the AI Content Assistant in Ads to generate ad copy from scratch using simple prompts for engagement, website visit and lead generation ads.
How do you do this?
Navigate to Marketing > Ads and click Create > Ad campaign. Currently, AI Content Assistant is only available for engagement, website visit and lead generation ads.
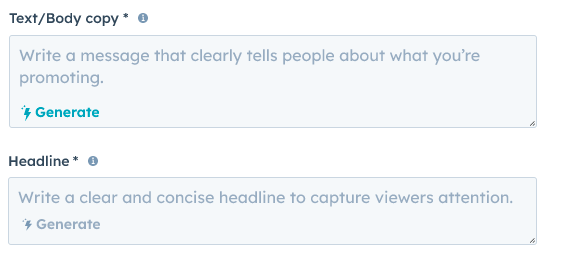
Navigate to the "Text/body copy" text box. You can select the blue "AI assistant" lightning bolt text and describe what your ad is about, and we will generate ad copy based on your description.
You can choose to regenerate the ad copy (up to 6 prompts), expand it or shorten it. Click "Generate more" to regenerate, and click the expand or shorten icons in the top right of the text box to expand or shorten the text.
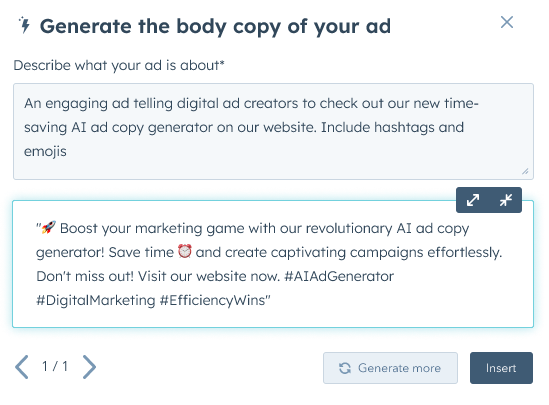
Click "Insert" to place the generated text in the ad.
Next, navigate to "Headline". You can generate a headline based on your text. You can choose "Generate more" prompts (up to once) to regenerate all suggested copy. Click "More like this" to generate more headlines like the selected one.
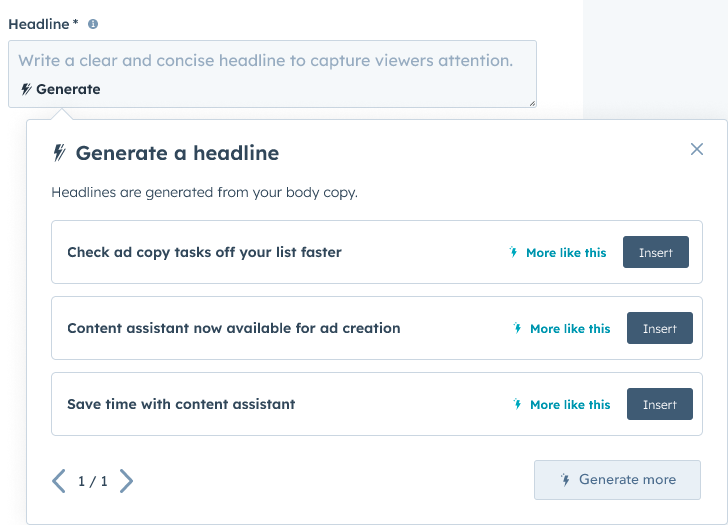
Finally, click "Insert" to place the desired headline in your created ad.
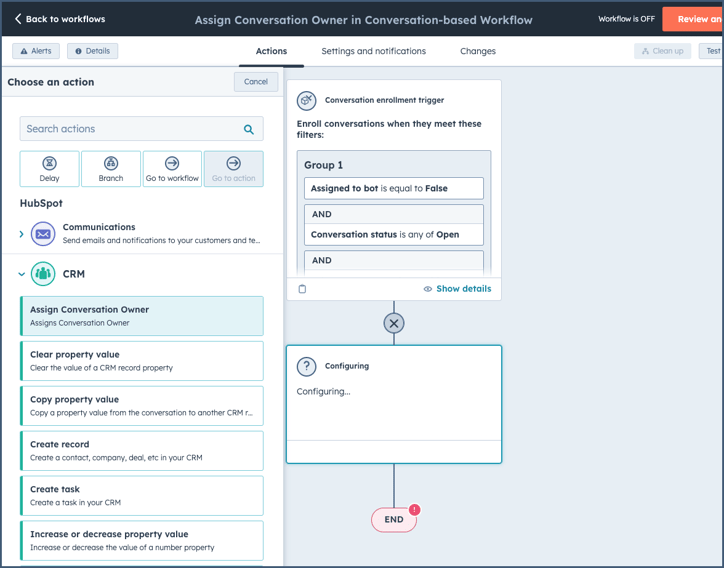
Assign conversation owner in workflows
Customers using workflows can now change the inbox and owner assignment for conversations with a new "Assign conversation owner" action.
How do you do this?
Within conversation-based workflows, admins can find a new action under CRM called "Assign conversation owner", which lets them assign conversations directly to a user in a specific inbox.
Improvements to the DocuSign integration
HubSpot is rolling out several improvements that will increase the functionality and usefulness of the DocuSign integration. These include custom field mappings, back-end changes to improve speed and reliability, and multiple UX improvements:
- Custom field mappings: You can now customise the mappings between HubSpot and DocuSign fields.
- Design improvements: New sliders, buttons, tooltips, a feature card and a connection status page under Settings have been added for a smoother experience.
- Stability and performance: The DocuSign application now has faster load times and fewer errors.
How do you do this?
Go to Inbox Conversations and click the "Compose" button in the bottom left. Choose a contact with email or WhatsApp information* stored in their record and start composing!
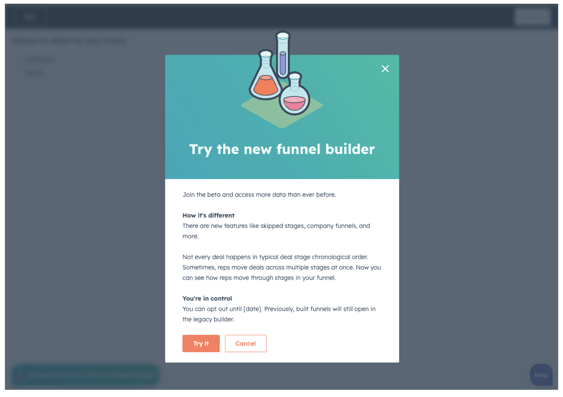
New custom funnel report builder supports optional stages and company lifecycle stages
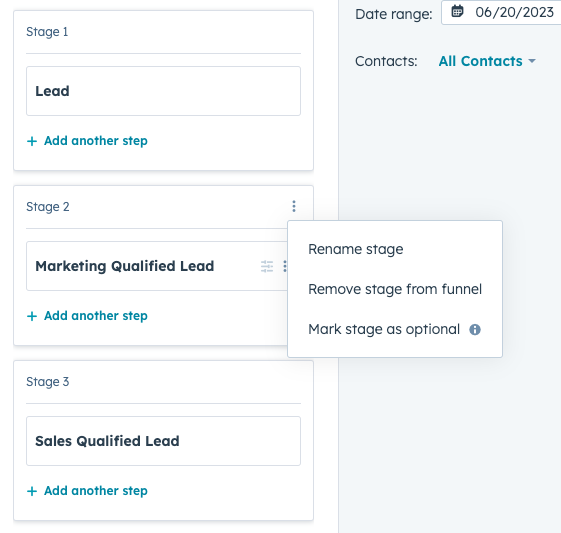
When creating a custom funnel report, you can now mark stages as "optional". This means that an entity (such as a deal or a contact) that has reached the end of the funnel can skip a number of stages between the first and last stage and still be included in the final figure.
For marketers using account-based marketing, we are also extending custom funnel reports to support company lifecycle stages.
How do you do this?
Once your portal is enrolled in this beta, a Super Admin needs to go to Reports > Reports. Click Create custom report in the top right. Select Funnels in the left panel. There, in the bottom left, your Super Admin will see a beaker icon. Click it and you will see the following notice about the beta. Click Try it out to get started:
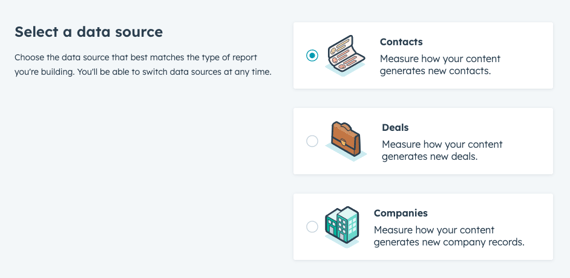
From there, you can choose from three object options to start building a funnel:
-
Contacts. This is how you can create a custom funnel report using lifecycle stages. Note: this also supports custom lifecycle stages.
-
Deals. This lets you create a custom funnel report based on any deal stage.
-
Companies. This lets you create a custom funnel report using lifecycle stages of company objects.
When you drag different stages into your funnel report, hover over the name of the stage. There you will see a hover setting where you can mark each stage as optional.
Inbound calling in the Calling Extensions SDK
With the introduction of inbound calling in the Calling Extensions SDK, calling app partners can now build inbound calling features into their app and make them available to HubSpot customers.
Customers can then start receiving inbound calls within HubSpot in the calling widget of their calling app.
Why does this matter?
Previously, customers had to switch back and forth between software applications because inbound calls could not be received in HubSpot.
Now customers can receive inbound calls in HubSpot when using calling apps. This allows customers to easily view data and make notes within HubSpot, without having to switch back and forth.
Inbound calls are saved to the Call Index page as soon as the call is answered. This provides easy access to make real-time notes and review the call after it has ended.
Company Insights on the HubSpot Mobile App [iOS only]
Once you have updated your iOS app, you will get access to the Company Insights button, which will appear on the Company Record, Task and Meeting bottom sheet.
The information generated within Company Insights is produced using ChatSpot prompts.
How do you do this?
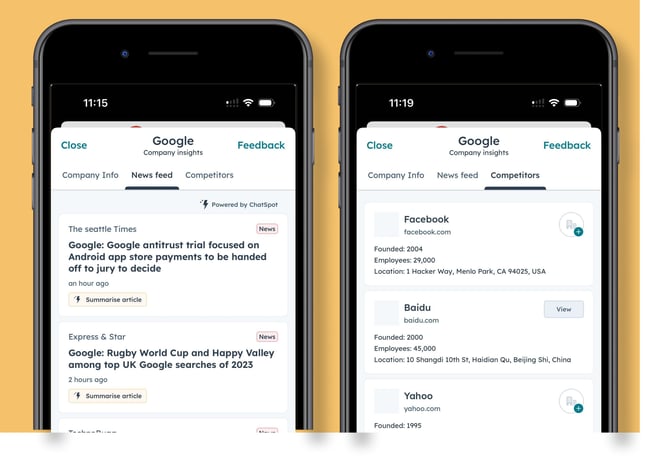
Tapping the icon lets you do the following:
Company info - this is information about the company that the rep does not necessarily have in the CRM, such as industry, social links, etc.
News feed - this is a feed of recent company news, videos, blogs and PR. Tapping Summarise condenses the content for a quick overview.
Competitors - list of competitors of that company. From here you can add the company to your CRM or tap the card to research the company further.
Customise Default Deal Name
Admins can customise the default deal name for deals created from existing contact and company records. Previously, HubSpot's default deal name was not configurable, which led to a lot of customer frustration. Customers will be able to configure the default deal name in the "Create deal" form under Settings, using a combination of personalisation tokens and/or static text.
How do you do this?
This functionality is available for deals created from existing contact or company records.
Enterprise customers can also use custom object personalisation tokens
Personalisation tokens pull field values from the contact or company record you are in (e.g. company name)
To configure the default deal name:
- Click the settings icon in the main navigation bar and navigate to Data Management > Objects > Deals > Settings > Creating deals > click Customise the 'Create deal' form
- In the left sidebar, click Add default values to configure the default deal name
- Click the Pencil (Edit) > Personalise to add extra personalisation tokens
- Click the Trash can (Delete) if you want to remove the default value for the deal name and leave the deal name field blank by default
- Click Update to check your work in the preview
- Click the Save button in the top right corner to apply your changes
To set the default deal name to blank:
- Navigate to the Add default values panel on the left and click the Trash can icon > Delete > Save to remove the default
- This ensures that the deal name field is blank by default and can be filled in manually when creating a deal on an existing record page
Note: When multiple personalisation tokens are currently used in the default deal name and not all tokens are available for the record, the deal name will be filled in with the tokens and/or text that is available.
Generating Reports with AI on Mobile
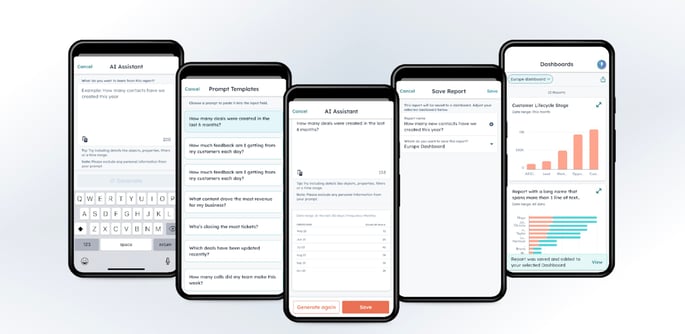
You can now use HubSpot AI to create reports with just a simple question or description on your phone, on Android and iOS.
AI-assisted reports make it easy to get started with creating the perfect report to answer critical business questions on the go!
AI is now available in the HubSpot mobile app in public beta, and it is here to change the way our customers work on mobile!
How do you do this
Once you open the Dashboard feature from the main mobile navigation, you will see a blue lightning bolt in the top right corner of your screen. Clicking on it takes you into the new Generate report AI experience.
There are two options for getting answers to your questions via a report:
- Write your question and click the Generate button.
- Select one of the ready-made templates and click the Generate button.
These reports work just like any other single-object HubSpot report, so you can save them to an existing dashboard. You can also edit them by changing the prompt with additions such as "in the past month", "show me a pie chart", or simply see what HubSpot AI comes up with on its own.
LinkedIn @mentions available in social monitoring
HubSpot has now added the ability to manage @mentions of LinkedIn company pages from comments or posts by their audience within the Monitor Streams in Social.
How do you do this
Under Social > Select the Monitor tab.
From here, start connecting one of your LinkedIn accounts by clicking "create stream" on the left under "LinkedIn Streams". You can then create a name for the stream and select which account you want to listen to for @mentions. Then click save.
If you find a post you want to see more information about, you can click on the rows and a side panel will open with the @mention post or @mention comment on the original post.
You can also reply to the @mention by typing in the text box and clicking the reply CTA. Your comment will be visible in the @mention side panel and on LinkedIn.
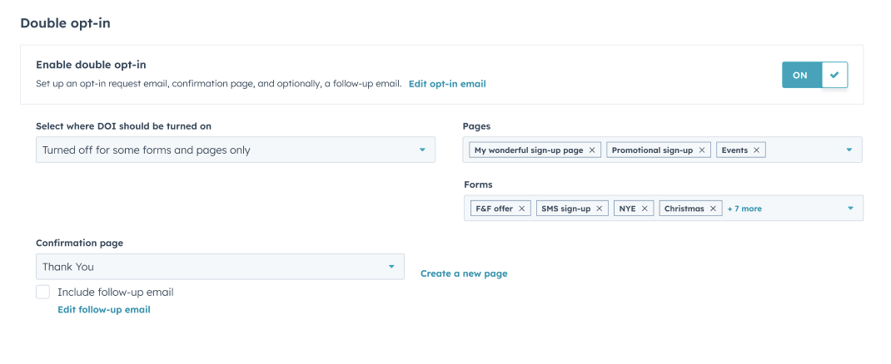
Enable Double Opt-In for forms
In the past, it was only possible to enable or disable double opt-in for certain pages created in HubSpot.
With this change, you can choose to enable or disable double opt-in for certain pages AND certain forms.
There are also some updates to the action descriptions/copy to make it clearer.
How do you do this?
Here's how to set up double opt-in per form:
- In your HubSpot account, click the Settings icon in the main navigation bar.
In the menu on the left, navigate to Marketing > Email. - Click the Subscriptions tab.
Navigate to the Double opt-in section on the page. - Click the Select where DOI should be enabled dropdown menu to choose how the double opt-in feature should be applied:
- All forms and pages: use double opt-in on all your HubSpot forms, pages and non-HubSpot forms. For new contacts created via an import or API, the subscription type must also be confirmed.
- Only enable for some forms and pages: use double opt-in only on specific HubSpot forms and pages.
- Only disable for some forms and pages: do not use the feature on specific HubSpot forms or pages.
If you have not yet enabled double opt-in, you must first publish the opt-in email to customise the email sent to customers after they submit a form, and then follow the steps above.
View, Delete, Share and Recall Quotes on Mobile [iOS and Android]
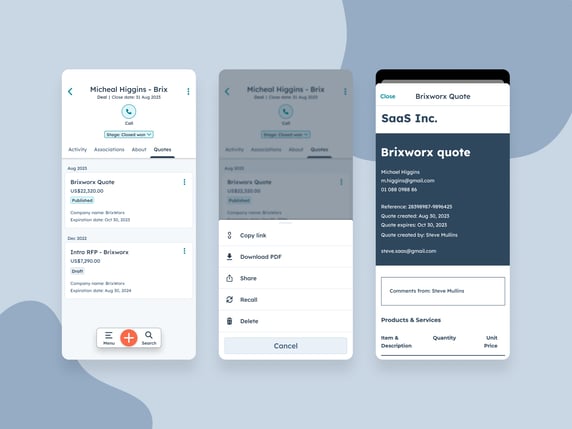
Customers on mobile now have the ability to view, delete and share quotes from the HubSpot Mobile apps. The feature is accessible from the Deal record.
How do you do this?
Go to Inbox Conversations and click the "Compose" button in the bottom left. Choose a contact with email or WhatsApp information* stored in their record and start composing!
Once you have updated the HubSpot Mobile App to the latest version, you will have access to the Quotes tab within the Deal record.
Navigate to the Deal record and tap the Quotes tab.
From here you can do the following:
- View the list of all quotes linked to that Deal, sorted by Creation date
- Tapping a published quote lets you preview the quote
- Each quote, depending on its status, gives you a number of options:
- Published quote lets you download a PDF, copy link, share, recall, etc.
- Draft quote can be deleted
- Tapping share lets you share the quote outside the HubSpot app and use your mobile phone's share functionality. You can use this to share the quote in email clients, messaging apps, etc. The quote is shared as a link.
Want to know more? Book a free call with Carel or get in touch with Sander!