The new HubSpot betas of February 2024
 Carsten huiskamp
Discover how adding beta features to your HubSpot account can take your business to the next level!
New HubSpot beta features
It's February again, which means we once again have access to a host of new HubSpot betas. These new betas bring exciting possibilities and can take your HubSpot portal to the next level. Let's take a look at some of these new features and how they can help you optimise your HubSpot account.
Betas in this blog:
Proactive alerts for new duplicate records.
HubSpot is introducing the ability to proactively monitor new duplicate records and receive alerts. This adds to data monitoring in the data quality notification centre. Users can also subscribe themselves and other users to alerts triggered by the new duplicate records warnings.
How do you do this?
Set up duplicate records monitoring.
Navigate to Reports > Data Management > Data Quality.
Click the 'Get started' button on the 'Data monitoring' card and then, in the top right, click 'Monitor for duplicates'.

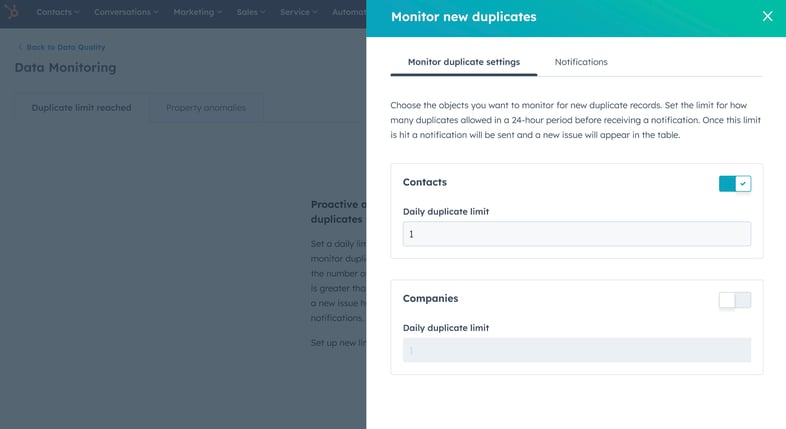
In the 'New duplicates' monitoring settings, you can choose to monitor contacts and/or companies and set a daily duplication limit.
-
In the 'Notifications' tab, you can subscribe yourself and other users with access to Data Quality to alerts via email, phone, Slack or Microsoft Teams whenever these warnings are triggered.
- Save the settings and the duplicates will now be checked for unexpected changes in volume.
Viewing duplicate alerts.
As soon as alerts appear on your dashboard, you have the option to view more details.
- In 'Data Quality', click 'View all' on the 'Data monitoring' card next to the 'New duplicate issues' issue type.
- In the duplicate record issues table, click on an alert by clicking the number of duplicate records under contact and/or company duplicates.
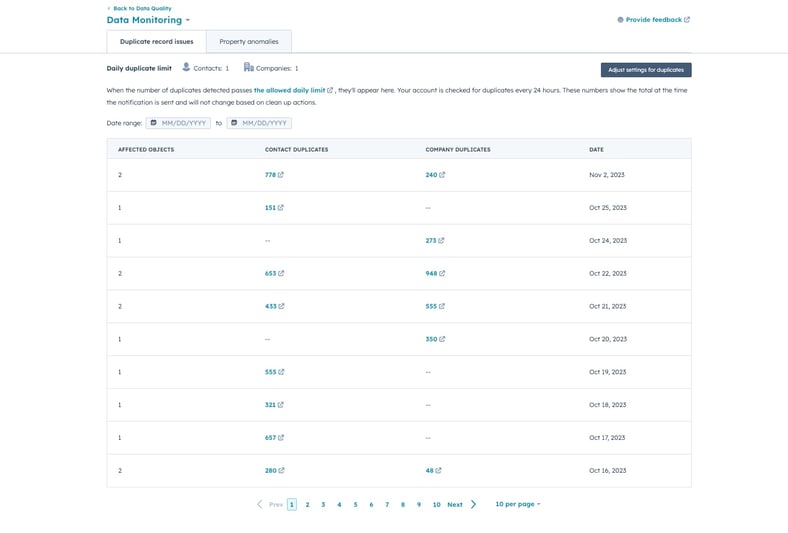
- You will be redirected to the 'Manage duplicate records' tool, and the duplicate records will be filtered by date.
- In the table below, you can click on the duplicate to view or dismiss it.
- You can also edit the notification settings for this property or stop monitoring it by clicking the Edit duplicate settings button.
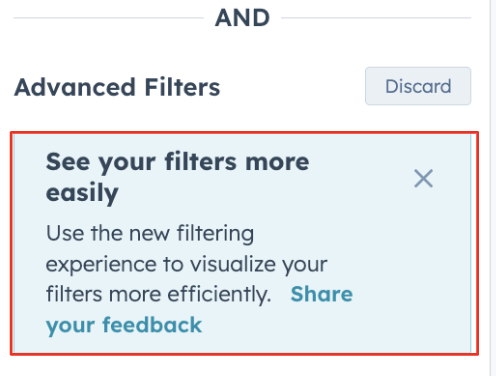
Redesign of the 'Advanced filters' for index pages.
The index page filters have been refreshed and improved, making it easier for us to build new filter functionality and make filters more consistent with the 'lists' tool. The redesign is intended to improve the existing filter component.
How do you do this?
To access the refreshed filters, go to any index page (contacts, companies, tickets, deals, etc.) and select 'Advanced filters'.
Lists without existing advanced filters
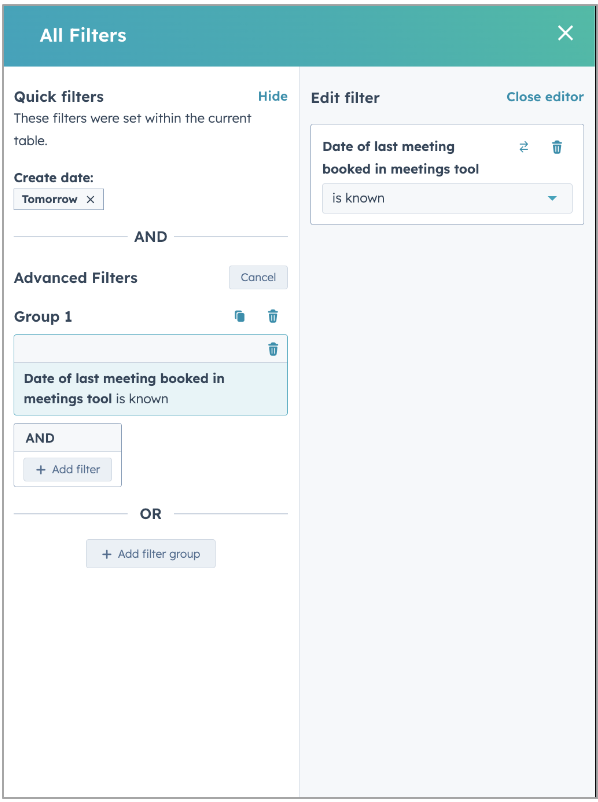
Select the property from the dropdown menu and add your filter criteria. Once you're done, select close editor or select the X icon in the top right of the filter panel to close the advanced panel entirely. Any new filter you add will immediately update the view in a draft status, but you must select Save in the table or on the board to apply your changes to the view filters.
Lists with existing advanced filters
Select Add filter group / Add filter to add an AND or OR condition to your filter set. Select your property from the dropdown menu and add your filter criteria.
To edit existing criteria, select the filter condition you want to change and you will see that filter condition in the editing panel. Make your changes and select close editor or select the X icon in the top right of the filter panel to close the advanced panel entirely. To save your changes for other team members or future sessions, select the save icon on the board or in the table.
Leave feedback:
Feel free to leave your opinion on this update via the link Share your feedback in the blue notice box under 'Advanced filters'.
New flow for creating lists & the ability to sort by the date records were added.
Three important updates for creating lists:
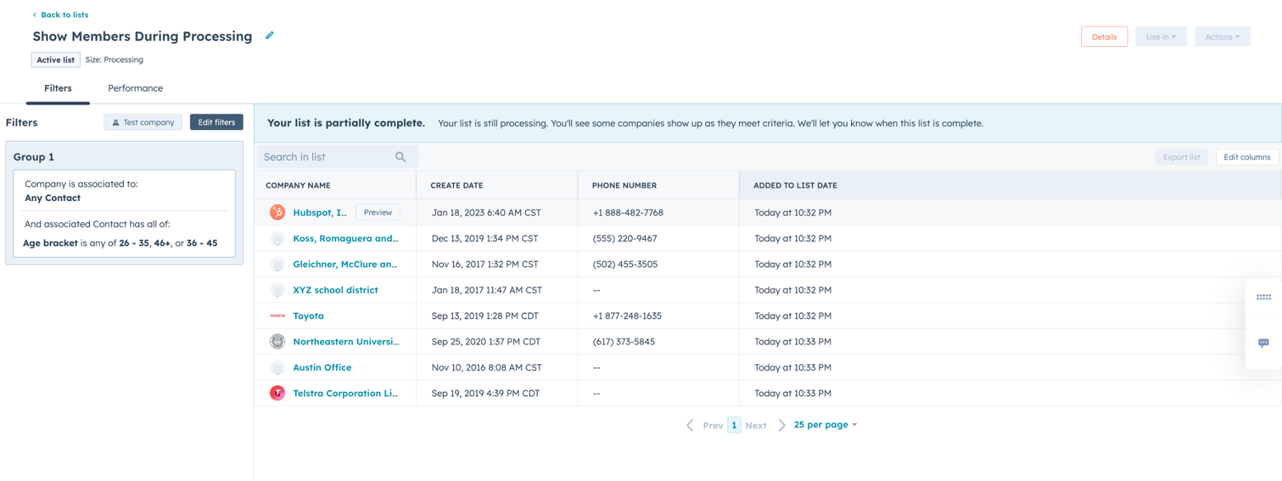
1. View records that meet your filter criteria while your list is still processing.
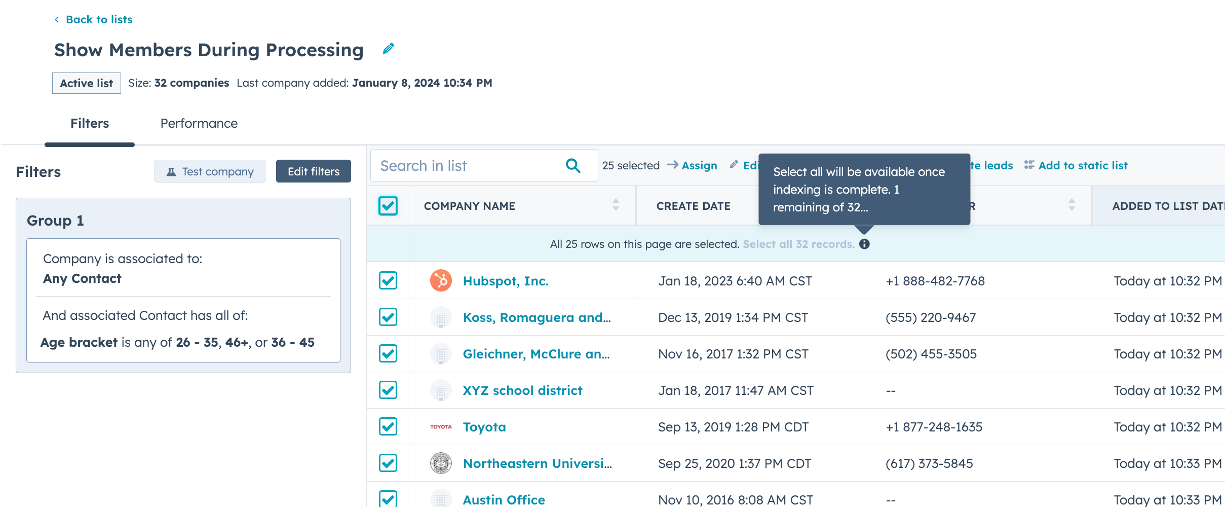
2. View all records that meet your filter criteria as soon as a list is complete.
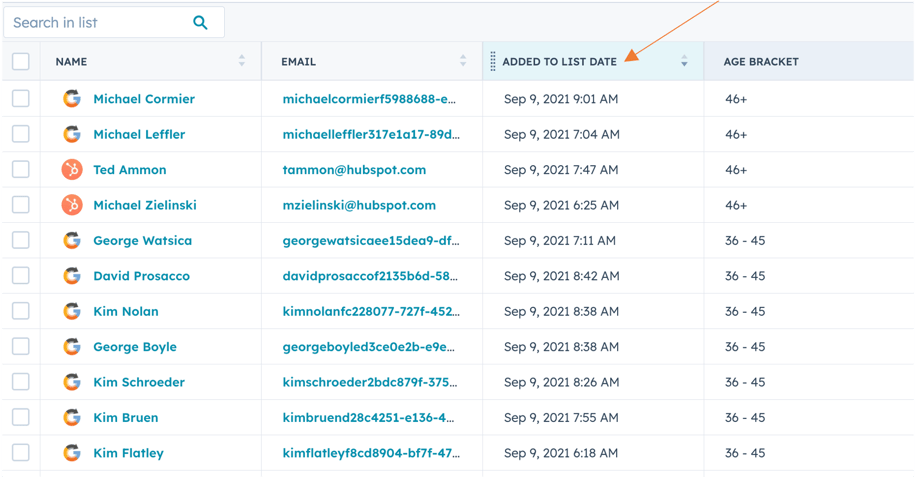
3. Sort by the 'Date added to list' column on any list.
Why does this matter?
1. Viewing records while lists are processing: When creating a list, it can be useful to review a few records to make sure they meet your criteria. Previously, you had to wait for the list to finish processing to review each record, either by clicking 'Preview' or opening the record in a new tab. Now you can do this while the list is still processing.
2. Viewing all records once a list is complete: Previously, when a list was complete, the records in the table would briefly not match the final list count. Now, as soon as a list is complete, you see all records in the table matching the final list count. This means you can confidently use your list for emails, reporting or automation.
3. Sorting by the 'Date added to list' column: Once a list is complete, you can sort by the 'Added to list date' to better track your lists' performance over time.
How do you do this?
Viewing records while lists are processing:
1. Create a new list.
2. During processing, you'll see members being added.
3. The banner lets you know the list is only partially complete.
4. Click 'preview' to open the record's sidebar.
Viewing all records once a list is complete:
1. Wait for a new list to finish processing.
2. See that all records appear in the table immediately (you can scroll through them if needed).
3. Your list is ready to be used in tools such as email, workflows or data sync.
4. If you need to bulk edit records, you'll see the number of records indexed so far. All records must be indexed before you can perform bulk actions on all records in a list.
Sorting by 'Date added to list' on any list in your portal:
1. Go to an existing or new list.
2. Click the 'Date added to list' column.
3. If it isn't available, click 'Edit columns' and add the column to your list view.
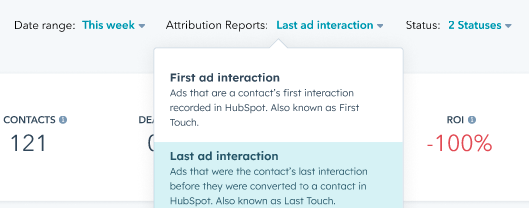
New filters for ad attribution.
HubSpot users now have access to 4 refreshed ad attribution filters that give a clearer picture of the customer journey.
How do you do this?
To view the new ad attribution filters, navigate to Marketing > Ads. Then click the dropdown menu at the top next to "Attribution reports".
Completely new help desk workspace.
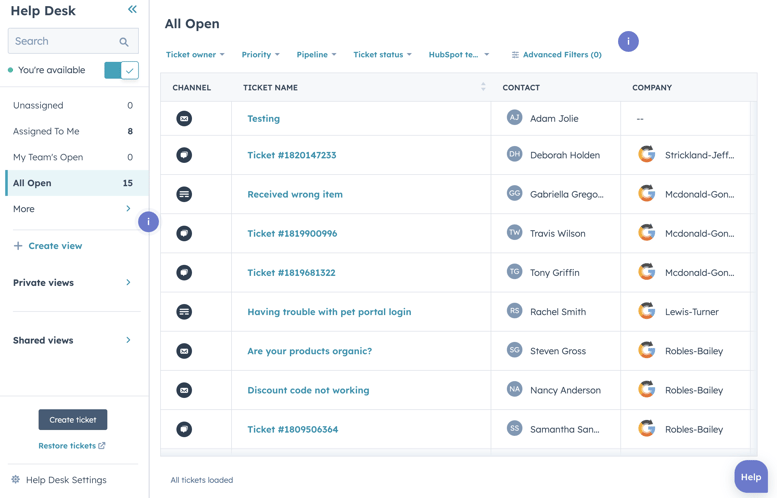
Help Desk is HubSpot's new ticket management workspace, built specifically for your support team to provide efficient and empathetic customer service.
Help Desk brings tickets and conversations together in a centralised workspace, allowing your support team to accept, handle and resolve customer requests far more efficiently. With omnichannel messaging, a 360-degree customer view based on CRM data, and a growing list of AI-assisted features, Help Desk includes all the tools your team needs to deliver world-class service.
How do you do this?
*Note: users must have a Service Seat to access and use the help desk.
Below you'll find a number of key steps you can take to get started using the help desk! For more information, visit the Help Desk knowledge base article.
- Navigating to Help Desk: You'll find Help Desk by navigating to Service > Help Desk. You'll find the Help Desk settings by navigating to Settings > Tools > Inbox & Help Desk > Help Desk.
- Connecting a new channel: Under settings, admins can connect email, form, chat, bot and FBM channels directly to Help Desk. Once connected, all incoming messages from these channels will automatically generate a ticket in the help desk.
- Migrating an existing channel from Inbox: If your team is already using the conversations inbox, admins also have the option to move an existing channel (and any associated conversations/tickets) from the inbox to the help desk. See this knowledge base article for more information.
- Staying organised in Help Desk: Your team can use features such as private and shared custom views and advanced filters to focus on the highest-priority issues.
Improved conversation view in Inbox and Help Desk

In an ongoing effort to refresh the conversation experience for better readability, HubSpot is updating the message header for conversations in the Inbox and Help Desk. The goal of updating the message header is to optimise vertical space in the thread and make a clearer distinction between sender and recipient at a glance.
As a result of these changes, a number of usability and accessibility updates have been added for a better viewing and messaging experience in the Inbox and Help Desk.
How do you do this?
Some changes you can expect with this redesign:
- Changing the blue header banner into a slim, compact sidebar to preserve more vertical space. This makes more messages visible in the same space, so you need to scroll less and get a better high-level overview of the conversations.
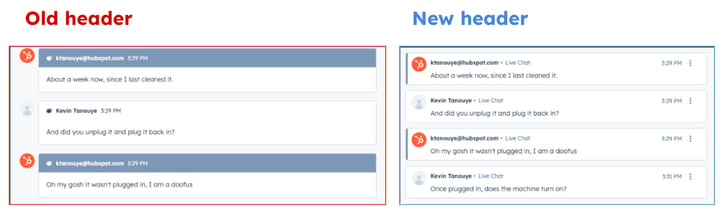
- The sidebar for forwarded messages will be yellow to distinguish it.

- Avatars and profile photos have been moved to the header. This also applies to automated and bot messages, for visual consistency within a conversation.

- Channel name replaces the channel icon for more clarity on the channel type.
- Timestamp moved from left to right, with a hover tooltip for full details.
- Email actions are visible by default on desktop. You don't need to hover to reply, reply all or forward.

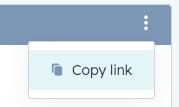
- Copy functions and shortcuts: you can now copy email addresses in the dropdown menu.
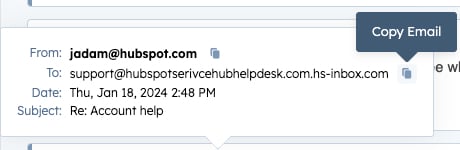
- And copy a link to a specific message in a conversation from the header.
Using the HubSpot Chrome extension in Salesforce
Sales teams can now use the HubSpot Chrome extension to work within Salesforce. Users can enrol contacts in sequences, send emails, make calls and view HubSpot records directly from Salesforce.
How do you do this?
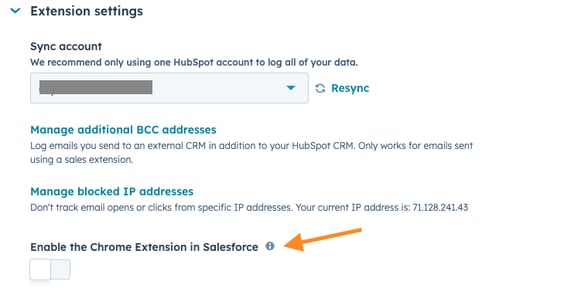
Sales teams using Salesforce CRM can enable the HubSpot Sales Extension in Salesforce by going to their Extensions settings under Settings > General > Email > Extension Settings:
Once enabled, users will be prompted to grant the HubSpot sales extension permission to access Salesforce.com.

Users must select "Allow" for the HubSpot Sales Chrome Extension to work in Salesforce.
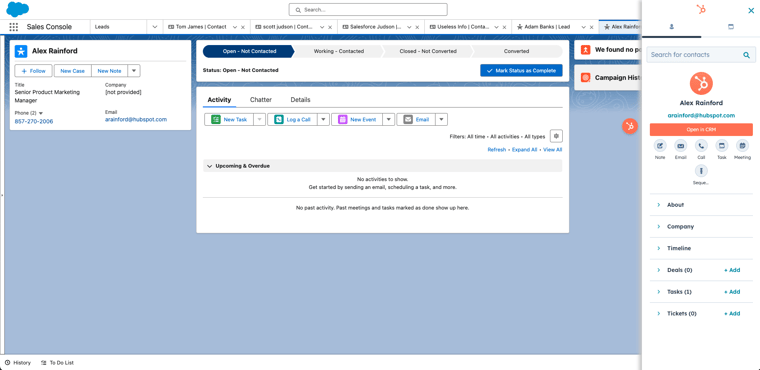
After this, sales teams can see the HubSpot Sales sidebar in Salesforce. This sidebar will match contact and company profiles in Salesforce with related profiles in HubSpot:
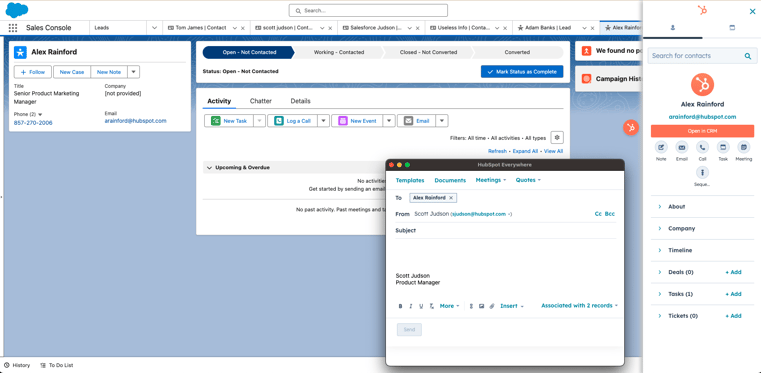
Customers can run bulk enrolment sequences via the contact and lead pages in Salesforce:
Want to know more? Schedule a free call with Carel or get in touch with Sander!